
Redis 教程: 使用 Redis Search 的 Text to Image AI 助手
介绍
最近几个月,文本到图像和矢量数据库模型市场都取得了显着增长。这两项技术本身就非常强大,将它们结合起来可以使它们发挥更大的作用!在本教程中,我将教您如何构建一个简单的应用程序,以支持为文本到图像模型查找相似提示和图像的过程。我们鼓励您加入 AIHubPro.cn 的社区,并在学习过程中详细了解如何使用 Redis我们的黑客马拉松人工智能!
Redi搜索
它是 Redis 数据库模块,可以从 Redis 数据库查询和索引数据。这是一个非常强大的工具,可以以多种不同的方式使用。在本教程中,我们将使用它来索引数据并使用向量相似性搜索查找相似的提示/图像。
夹子
CLIP是一种从自然语言监督中学习视觉概念的神经网络。它在各种图像-文本对上进行训练,可用于预测给定文本描述最可能的图像,或给定图像最可能的文本描述。我们将使用它根据我们输入的描述或我们提供的图像来查找类似的提示和图像。
编码
好的,我们可以开始编码了。我们的应用程序将由两部分组成:
APIStreamlit 应用程序 (UI)。
Redis 数据库
首先,我们需要 Redis 数据库。我将为此使用 Redis Cloud,但您可以为此使用 Docker 映像。当然你可以免费入手Redis。
数据
出于本项目的目的,我们将使用流行的Flickr8k数据集。你可以从互联网上下载它,例如,它在 Kaggle 上很容易获得。
依赖关系
为了开始我们的项目,他建议创建一个合适的文件结构。让我们创建一个主目录。
mkdir t2i-assistant-rediscd t2i-assistant-redis现在我们可以创建一个虚拟环境并安装所有必要的依赖项。
python3 -m venv venv# for linux/macsource venv/bin/activate# for windows./venv/Scripts/activate让我们创建 requirements.txt 文件并安装所有必要的依赖项。文件内容:
redisfastapipython-multipartuvicorn[standard]Pillowtransformersopen_clip_torchtorchstreamlitrequests安装所有依赖项:
pip install -r requirements.txt现在我们可以准备剩下的文件了。我的文件夹结构如下所示:
├── data│ ├── captions.csv│ ├── Images│ ├── <image_name>.jpg├── src│ ├── model│ ├── __init__.py│ ├── clip.py│ ├── utils│ ├── __init__.py│ ├── data.py│ ├── main.py│ ├── streamlit.py├── venv (virtual environment)├── requirements.txt让我们开始编码吧!
模型
我建议首先准备用于照片处理和字幕的模型。让我们在src/model/clip.py文件中完成它。首先,我们需要导入所有必要的依赖项。
from typing import Listimport open_clipimport torchfrom PIL import Image我们可以为我们的模型准备一个类,然后实现一些方法,使我们能够以更简单的方式使用它的功能。我将使用 LAION AI 的 CLIP 实现。你可以在 Hugging Face 上找到它。
class CLIP: def __init__( self, model_name="hf-hub:laion/CLIP-ViT-H-14-laion2B-s32B-b79K", device="cpu" ): model, _, preprocess_img = open_clip.create_model_and_transforms(model_name) self.device = device self.model = model.to(self.device) self.preprocess_img = preprocess_img self.tokenizer = open_clip.get_tokenizer(model_name) def encode_image(self, image: Image.Image | List[Image.Image], normalize=True): processed_img = ( torch.stack([self.preprocess_img(img).to(self.device) for img in image]) if type(image) == list else self.preprocess_img(image).to(self.device) ) if processed_img.dim() == 3: processed_img = processed_img.unsqueeze(0) image_features = self.model.encode_image(processed_img) if normalize: image_features /= image_features.norm(dim=-1, keepdim=True) return image_features def encode_text(self, text: str | List[str], normalize=True): text = self.tokenizer(text).to(self.device) text_features = self.model.encode_text(text) if normalize: text_features /= text_features.norm(dim=-1, keepdim=True) return text_features工具
现在我们可以继续讨论在 Redis 数据库中索引我们的数据所需的实用函数。我将开始导入依赖项。
import osfrom uuid import uuid4import pandas as pdfrom redis.commands.search.field import TextField, VectorField我还将定义一个常量值 – EMBEDDING_DIM。它将用于定义用于索引我们的数据的向量的大小(从 CLIP 模型返回的大小,您可以从模型本身或从 Hugging Face Docs 中获取)。
EMBEDDING_DIM = 1024另一件事是嵌入我们的描述的功能。
def embed_record(clip, caption): caption_features = clip.encode_text(caption).squeeze() return caption_features.cpu().detach().numpy()现在我们可以创建一个函数来索引我们在 Redis 数据库中的数据。
def index_data(redis_client, clip): # when running for the first time, we don't need to drop index. redis_client.ft().dropindex() DATA_DIR = os.path.join("data") df = pd.read_csv(os.path.join(DATA_DIR, "captions.csv")) redis_client.ft().create_index( [ TextField("image"), TextField("caption"), VectorField( "caption_features", "FLAT", { "TYPE": "FLOAT32", "DIM": EMBEDDING_DIM, "DISTANCE_METRIC": "COSINE", }, ), ] ) selected_data = ( # select every 5th row (each image has 5 similar captions) df.iloc[::5, :] .apply( lambda x: (x["image"], x["caption"], embed_record(clip, x["caption"])), axis=1, ) .to_numpy() ) pipe = redis_client.pipeline() i = 0 for img_filename, caption, caption_features in selected_data: pipe.hset( uuid4().hex, mapping={ "image": img_filename, "caption": caption, "caption_features": caption_features.tobytes(), }, ) i += 1 pipe.execute()应用程序接口
让我们继续我们的 API。我们将在文件中实现它src/main.py。我们需要创建两个端点——一个用于基于图像的搜索,一个用于基于描述的搜索。但是让我们从必要的依赖项开始。
import numpy as npimport redisfrom fastapi import FastAPI, HTTPException, UploadFile, statusfrom PIL import Imagefrom pydantic import BaseModelfrom redis.commands.search.query import Queryfrom src.model import CLIPfrom src.utils import index_data此时我们可以继续初始化模型和 Redis 客户端。同样在这一点上,索引我们的数据会很有用。
clip = CLIP()redis_client = redis.Redis( host="redis-10292.c23738.us-east-1-mz.ec2.cloud.rlrcp.com", port=10292, password="newnative",)index_data(redis_client, clip)在继续执行 API 之前,您要准备的最后一件事是查询图像的函数。
def query_image(caption_features: np.array, n=1): if caption_features.dtype != np.float32: raise TypeError("caption_features must be of type float32") query = ( Query(f"*=>[KNN {n} @caption_features $caption_features]") .return_fields("image", "caption") .dialect(2) ) result = redis_client.ft().search( query=query, query_params={"caption_features": caption_features.tobytes()} ) return result.docsAPI 实现的时机已经成熟。我们需要创建两个端点:
一个用于图像处理,一个用于处理描述。两者都应返回描述和指向与输入数据最相似对象的路径。
我的代码将如下所示:
class SearchBody(BaseModel): description: strapp = FastAPI()@app.post("/search/image/")async def search_by_image(image: UploadFile): # check if image is valid if not image.content_type.startswith("image/"): raise HTTPException( status_code=status.HTTP_422_UNPROCESSABLE_ENTITY, detail="File is not an image", ) image = Image.open(image.file) # embed image using CLIP img_features = clip.encode_image(image) img_features = img_features.squeeze().cpu().detach().numpy().astype(np.float32) # search for similar images/prompts result = query_image(img_features) result = result[0] return { "image": result["image"], "caption": result["caption"], }@app.post("/search/description/")async def search_description(body: SearchBody): # embed description using CLIP caption_features = clip.encode_text(body.description) # cast to float32 caption_features = ( caption_features.squeeze().cpu().detach().numpy().astype(np.float32) ) # search for similar images/prompts result = query_image(caption_features) result = result[0] return { "image": result["image"], "caption": result["caption"], }要运行我们的 API,我们可以在终端中使用命令:
uvicorn src.main:app --host 0.0.0.0 --port 8000用户界面
我们应用程序的最后一部分是 UI 实现。为此,我们将使用 Streamlit。我们将创建一个简单的界面,其中包含文本输入、文件输入(用于图像)和提交按钮。
我们开始做吧!
import jsonimport osimport requestsimport streamlit as st# Add a prompt to the appprompt = st.text_input("Prompt")# Add file uploader to the appimage = st.file_uploader("Upload an image")# Add a button to the appbutton = st.button("Find similar images/prompts")# when the button is clickedif button: # if the user uploaded an image if image: URL = "http://localhost:8000/search/image" IMG_EXT = ["jpg", "jpeg", "png"] file_extension = image.name.split(".")[-1] print(file_extension) if not file_extension in IMG_EXT: print("Invalid file extension") # send the image to the server (form data) files = { "image": ( image.name, image.read(), f"image/{file_extension}", ), } response = requests.post( URL, files=files, ) # display the response res = response.json() caption = res["caption"] image = os.path.join("data", "Images", res["image"]) st.image(image, caption=caption) if prompt and not image: URL = "http://localhost:8000/search/description" response = requests.post( URL, data=json.dumps({"description": prompt}), ) res = response.json() caption = res["caption"] image = os.path.join("data", "Images", res["image"]) st.image(image, caption=caption)好的,我想我们准备好了。
让我们运行我们的应用程序。
streamlit run src/streamlit.py结论
让我们检查一下我们的应用程序是如何工作的。我们可以通过输入描述或上传图片来做到这一点。
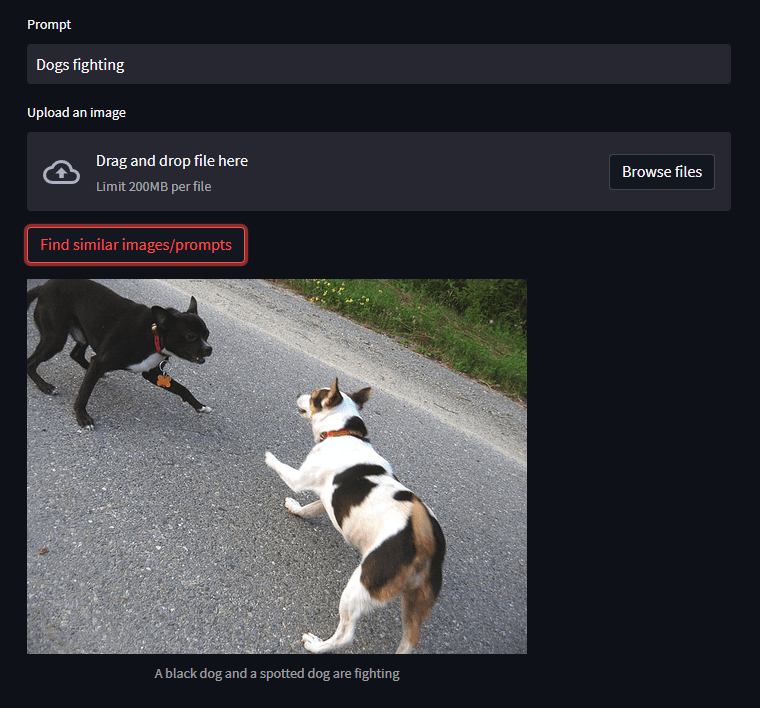
如您所见,结果非常棒!
如果你已经设法解决了这一点 – 干得好!希望你学到了很多。我鼓励您探索其他技术。也许您想构建 GPT3 应用程序?或者只是用它升级你的项目?或者您想获得灵感并构建 Cohere 应用程序 – AI 的潜力是无限的!
谢谢你!– AI未来百科 ; 探索AI的边界与未来! 懂您的AI未来站