在本 GPT-3 教程结束时,您将构建并部署您自己的由 GPT-3 提供支持的 Web 应用程序。您将能够使用 GPT-3 库来构建您自己的应用程序。本教程适合所有假定您对 React 和 NextJS 有一定基础知识的人。如果您不熟悉这些技术,您可能需要在开始之前查看以下资源
我们将使用来自 OpenAI 的 GPT-3 ,一个 1750 亿参数的文本转换器。此外,我们将使用 NextJS 和 Replit 来构建和托管我们的应用程序。本教程的目的是涵盖启动和运行由 GPT-3 提供支持的 Web 应用程序的基础知识。
设置 Replit 并从 Github 导入我们的项目 我们首先在 Replit 创建一个帐户,我们将在其中导入和初始化我们的项目。这将使我们能够获得一个工作构建,以便我们可以实时查看我们的更新。
1. Replit入门 您需要做的第一件事是创建一个新的 Replit 项目。为此,如果您还没有帐户,请前往 Replit 并注册一个帐户。
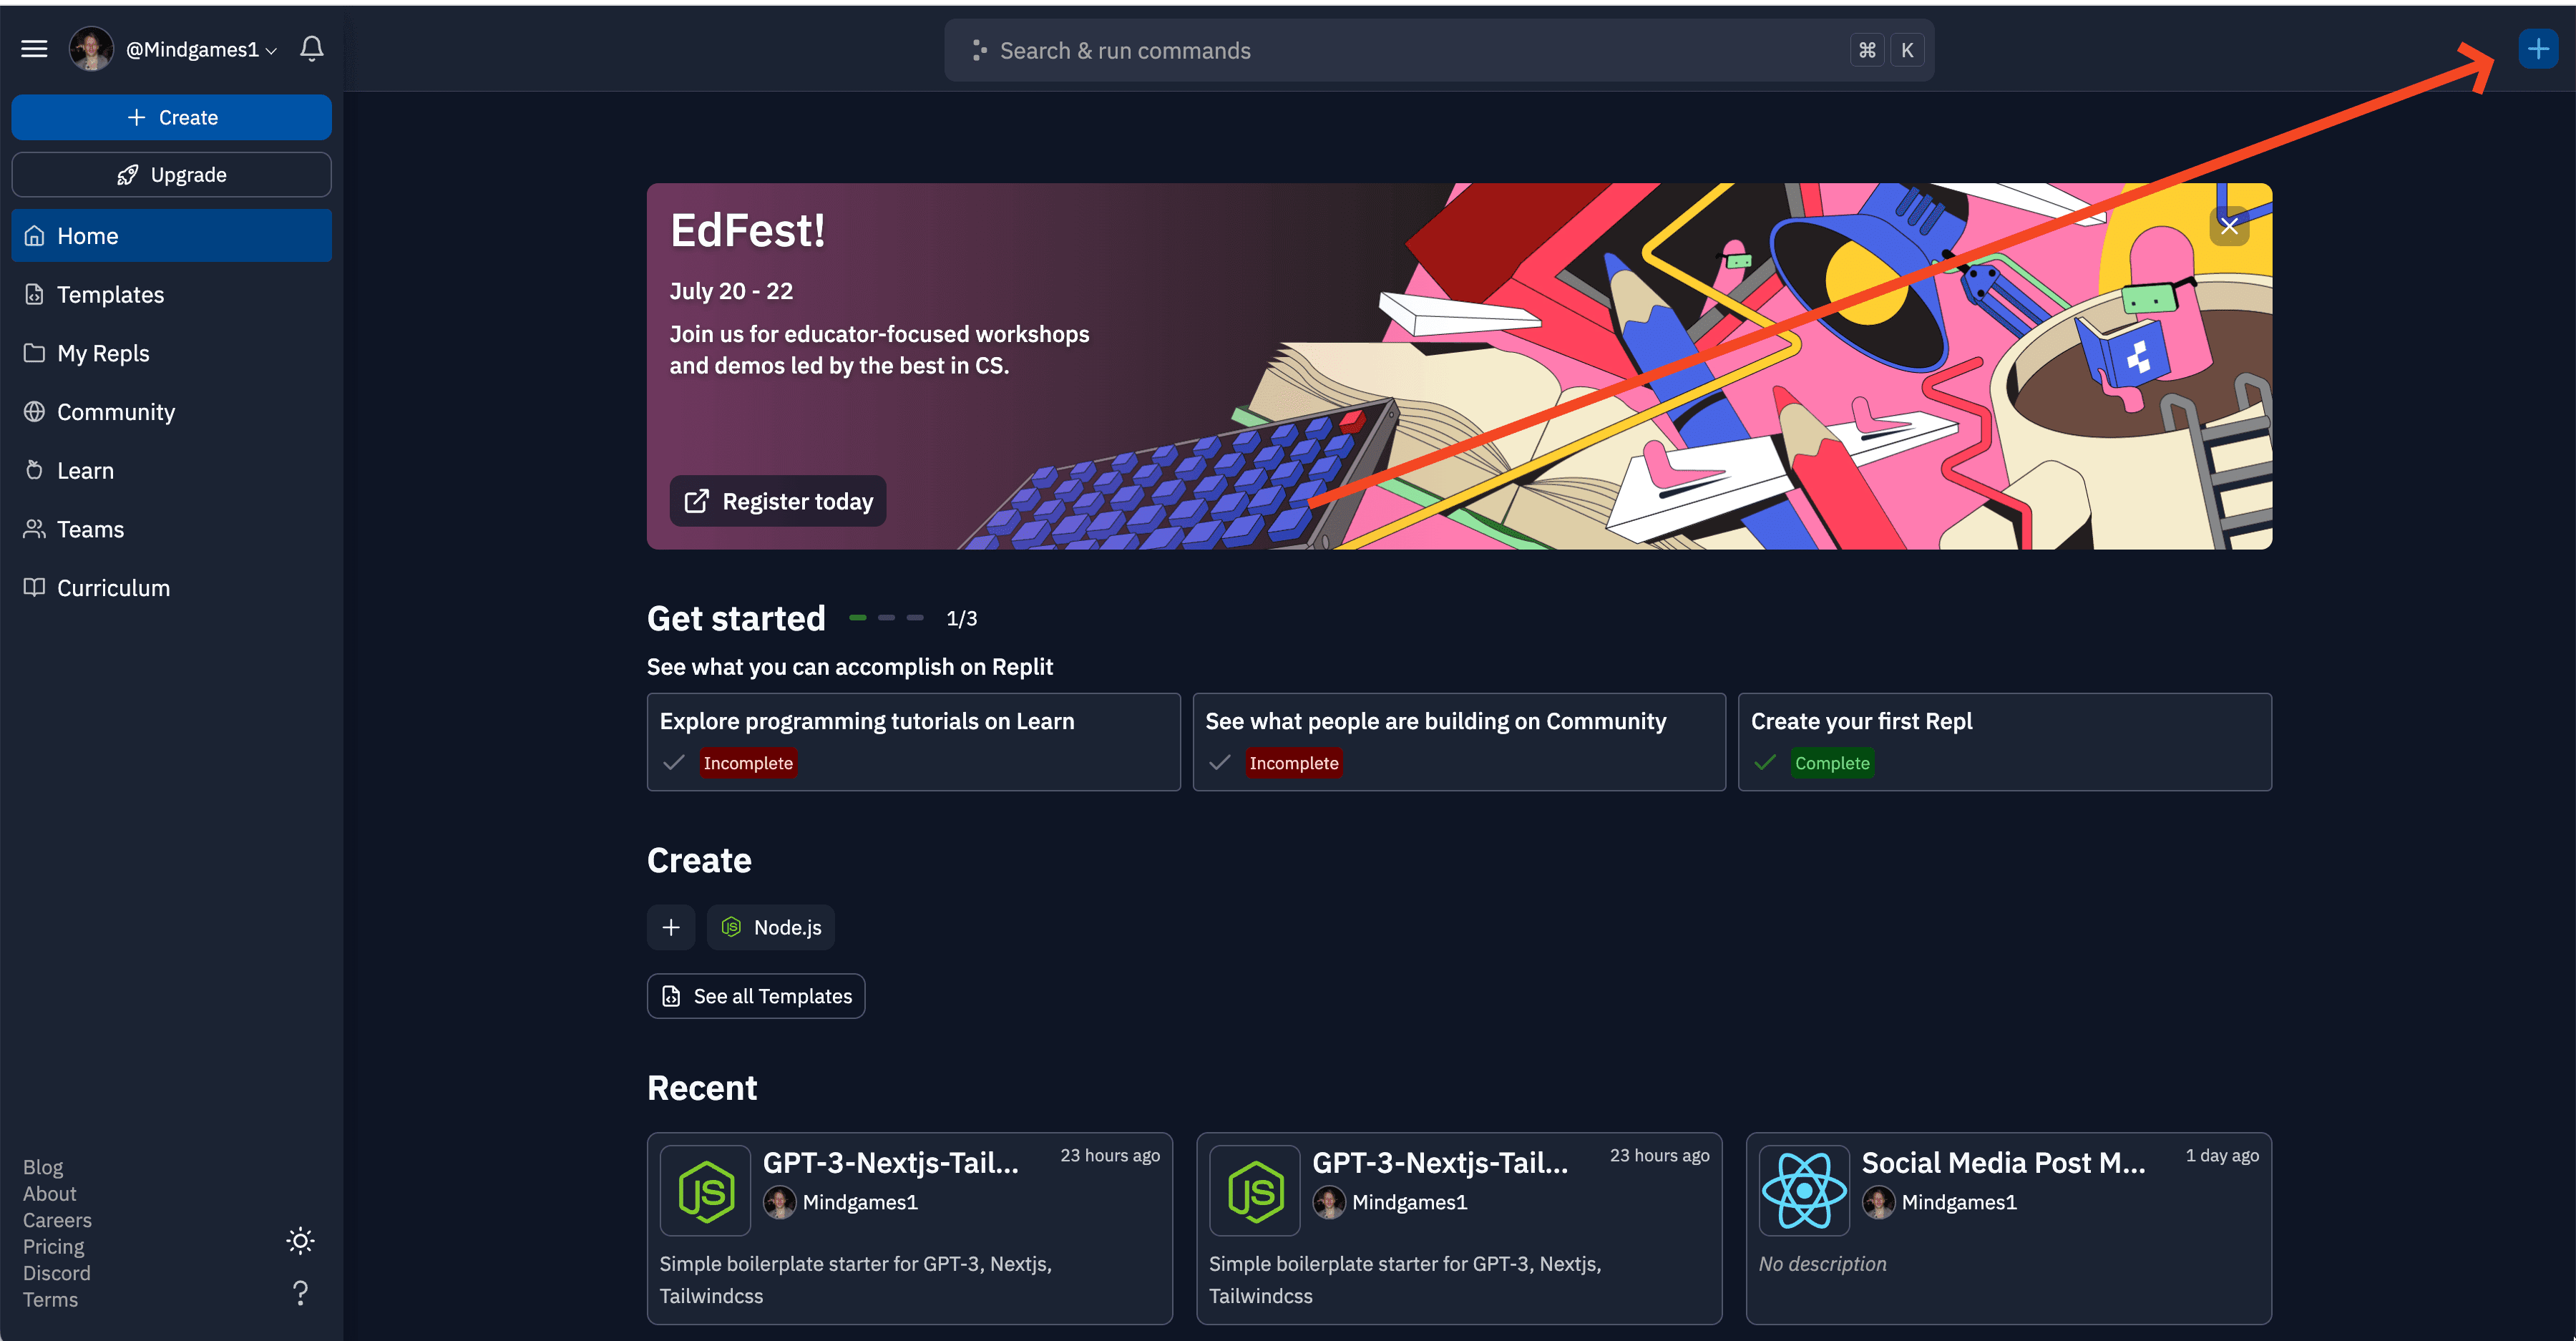
2.新建一个项目 登录 replit 后,单击右上角的 + 号
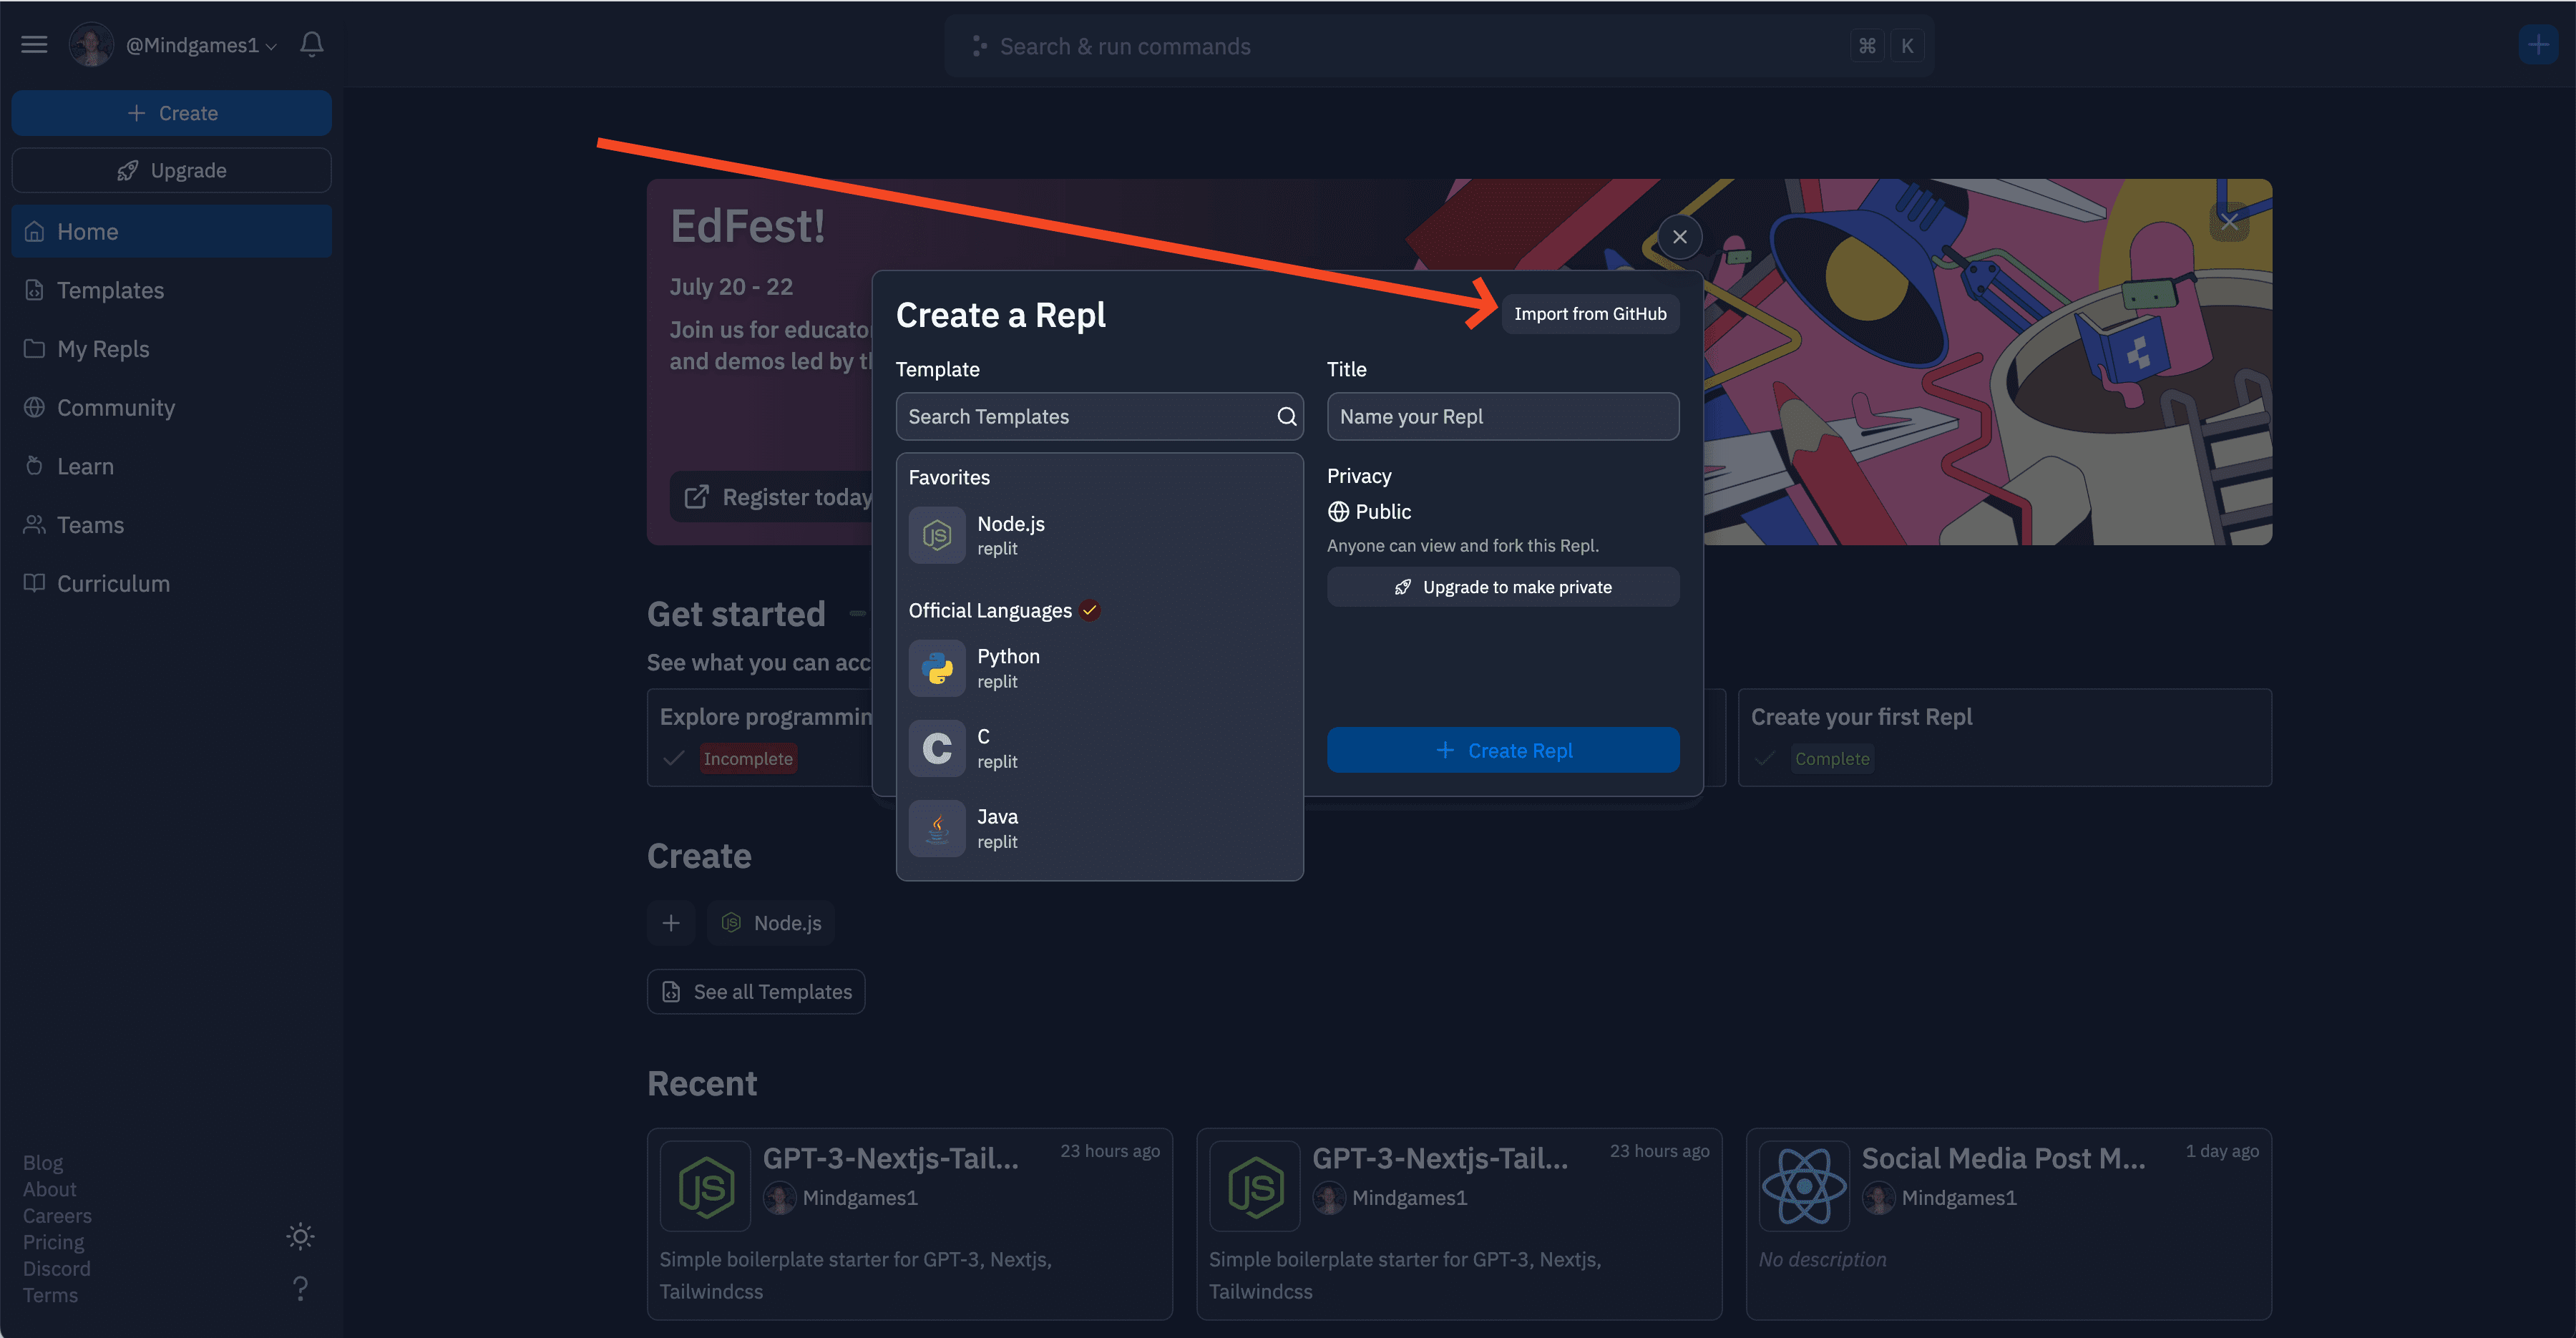
3. 从 Github 导入 GPT-3 样板 在本教程中,我们将使用 GPT-3 样板,这将使我们的生活更轻松,并允许您在 20 分钟内构建自己的 GPT-3 驱动的应用程序。
单击从 Github 导入过去 https://github.com/nextgrid/GPT-3-Nextjs-Tailwind-starter在 GitHub URL 字段中单击 从 Github 导入 按钮
通过单击“从 Github 导入”按钮从 Github 导入样板文件 安装依赖项和配置我们的项目 我们需要做的第一件事是从 OpenAI 添加我们的 GPT-3 API 密钥。如果您没有,可以通过在 beta.openai.com 上注册来获得一个。创建帐户后,您可以转到您的个人资料并单击“API 密钥”选项卡或只需单击此链接 OpenAI API 密钥。
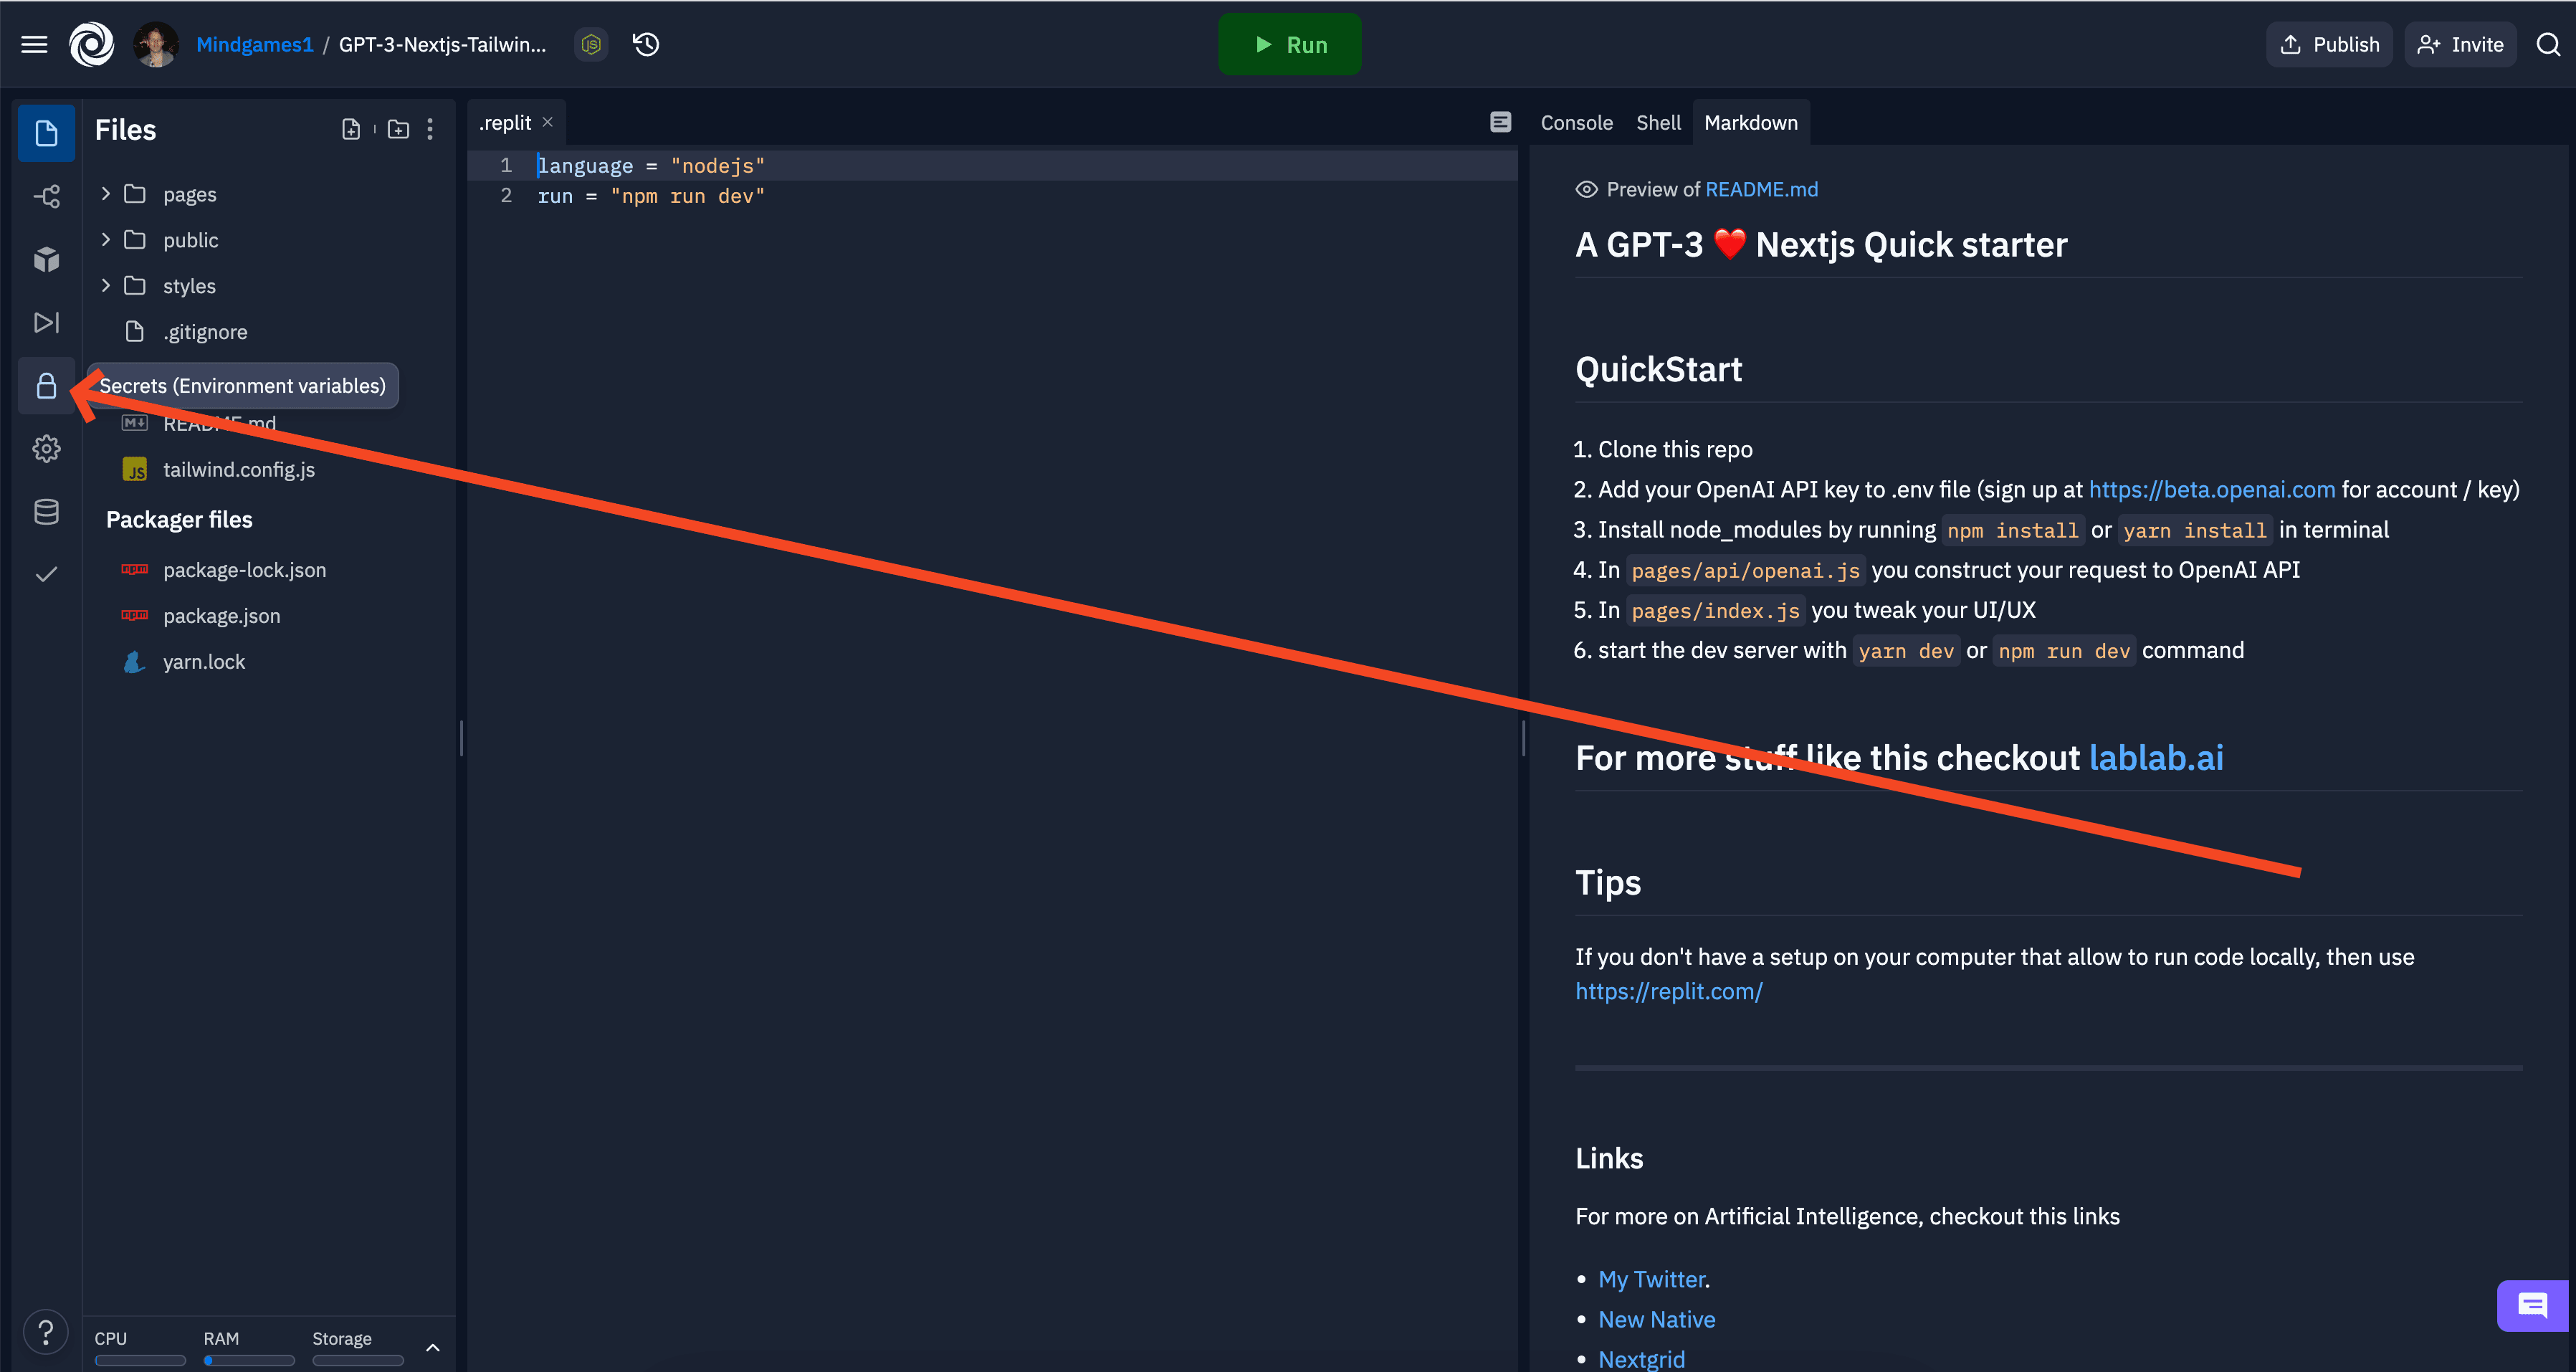
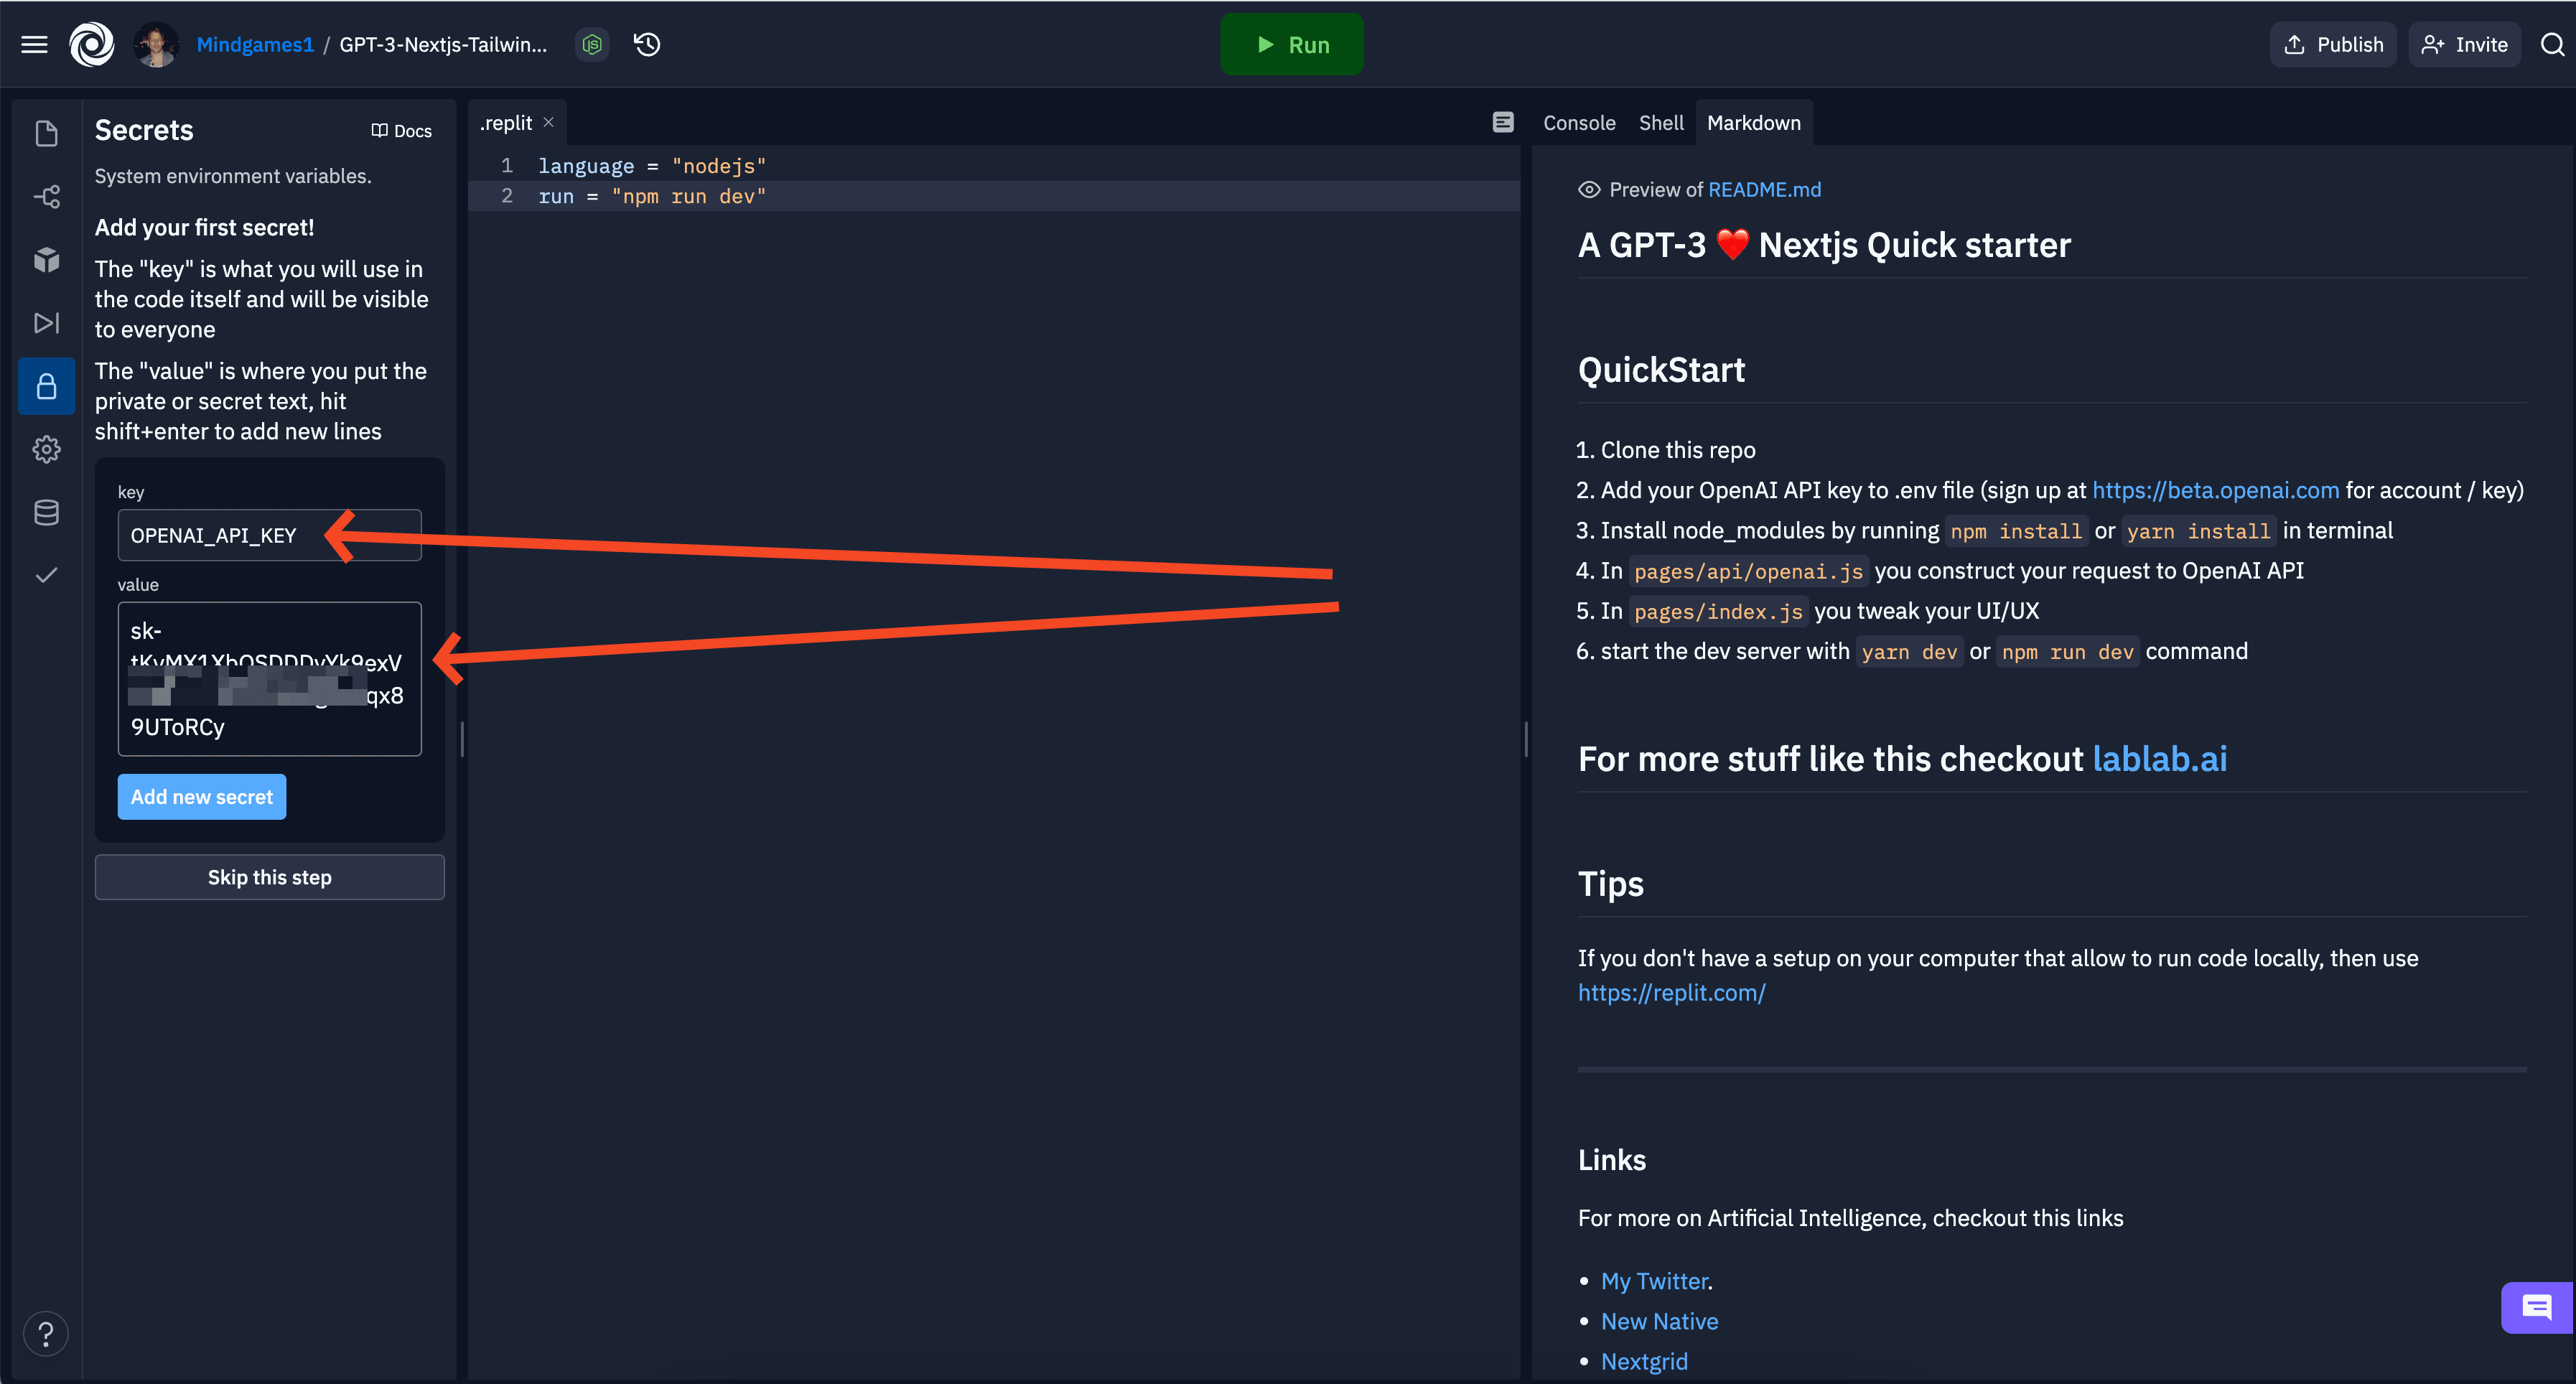
1. 将我们的 GPT-3 API 密钥添加到 .env 文件 单击右侧的锁🔒 图标在密钥字段中写入 OPENAI_API_KEY在值字段中写入您的 GPT-3 API 密钥,它应该类似于 sk-tKyMX1XbOS***Agaa5qx89UToRCy
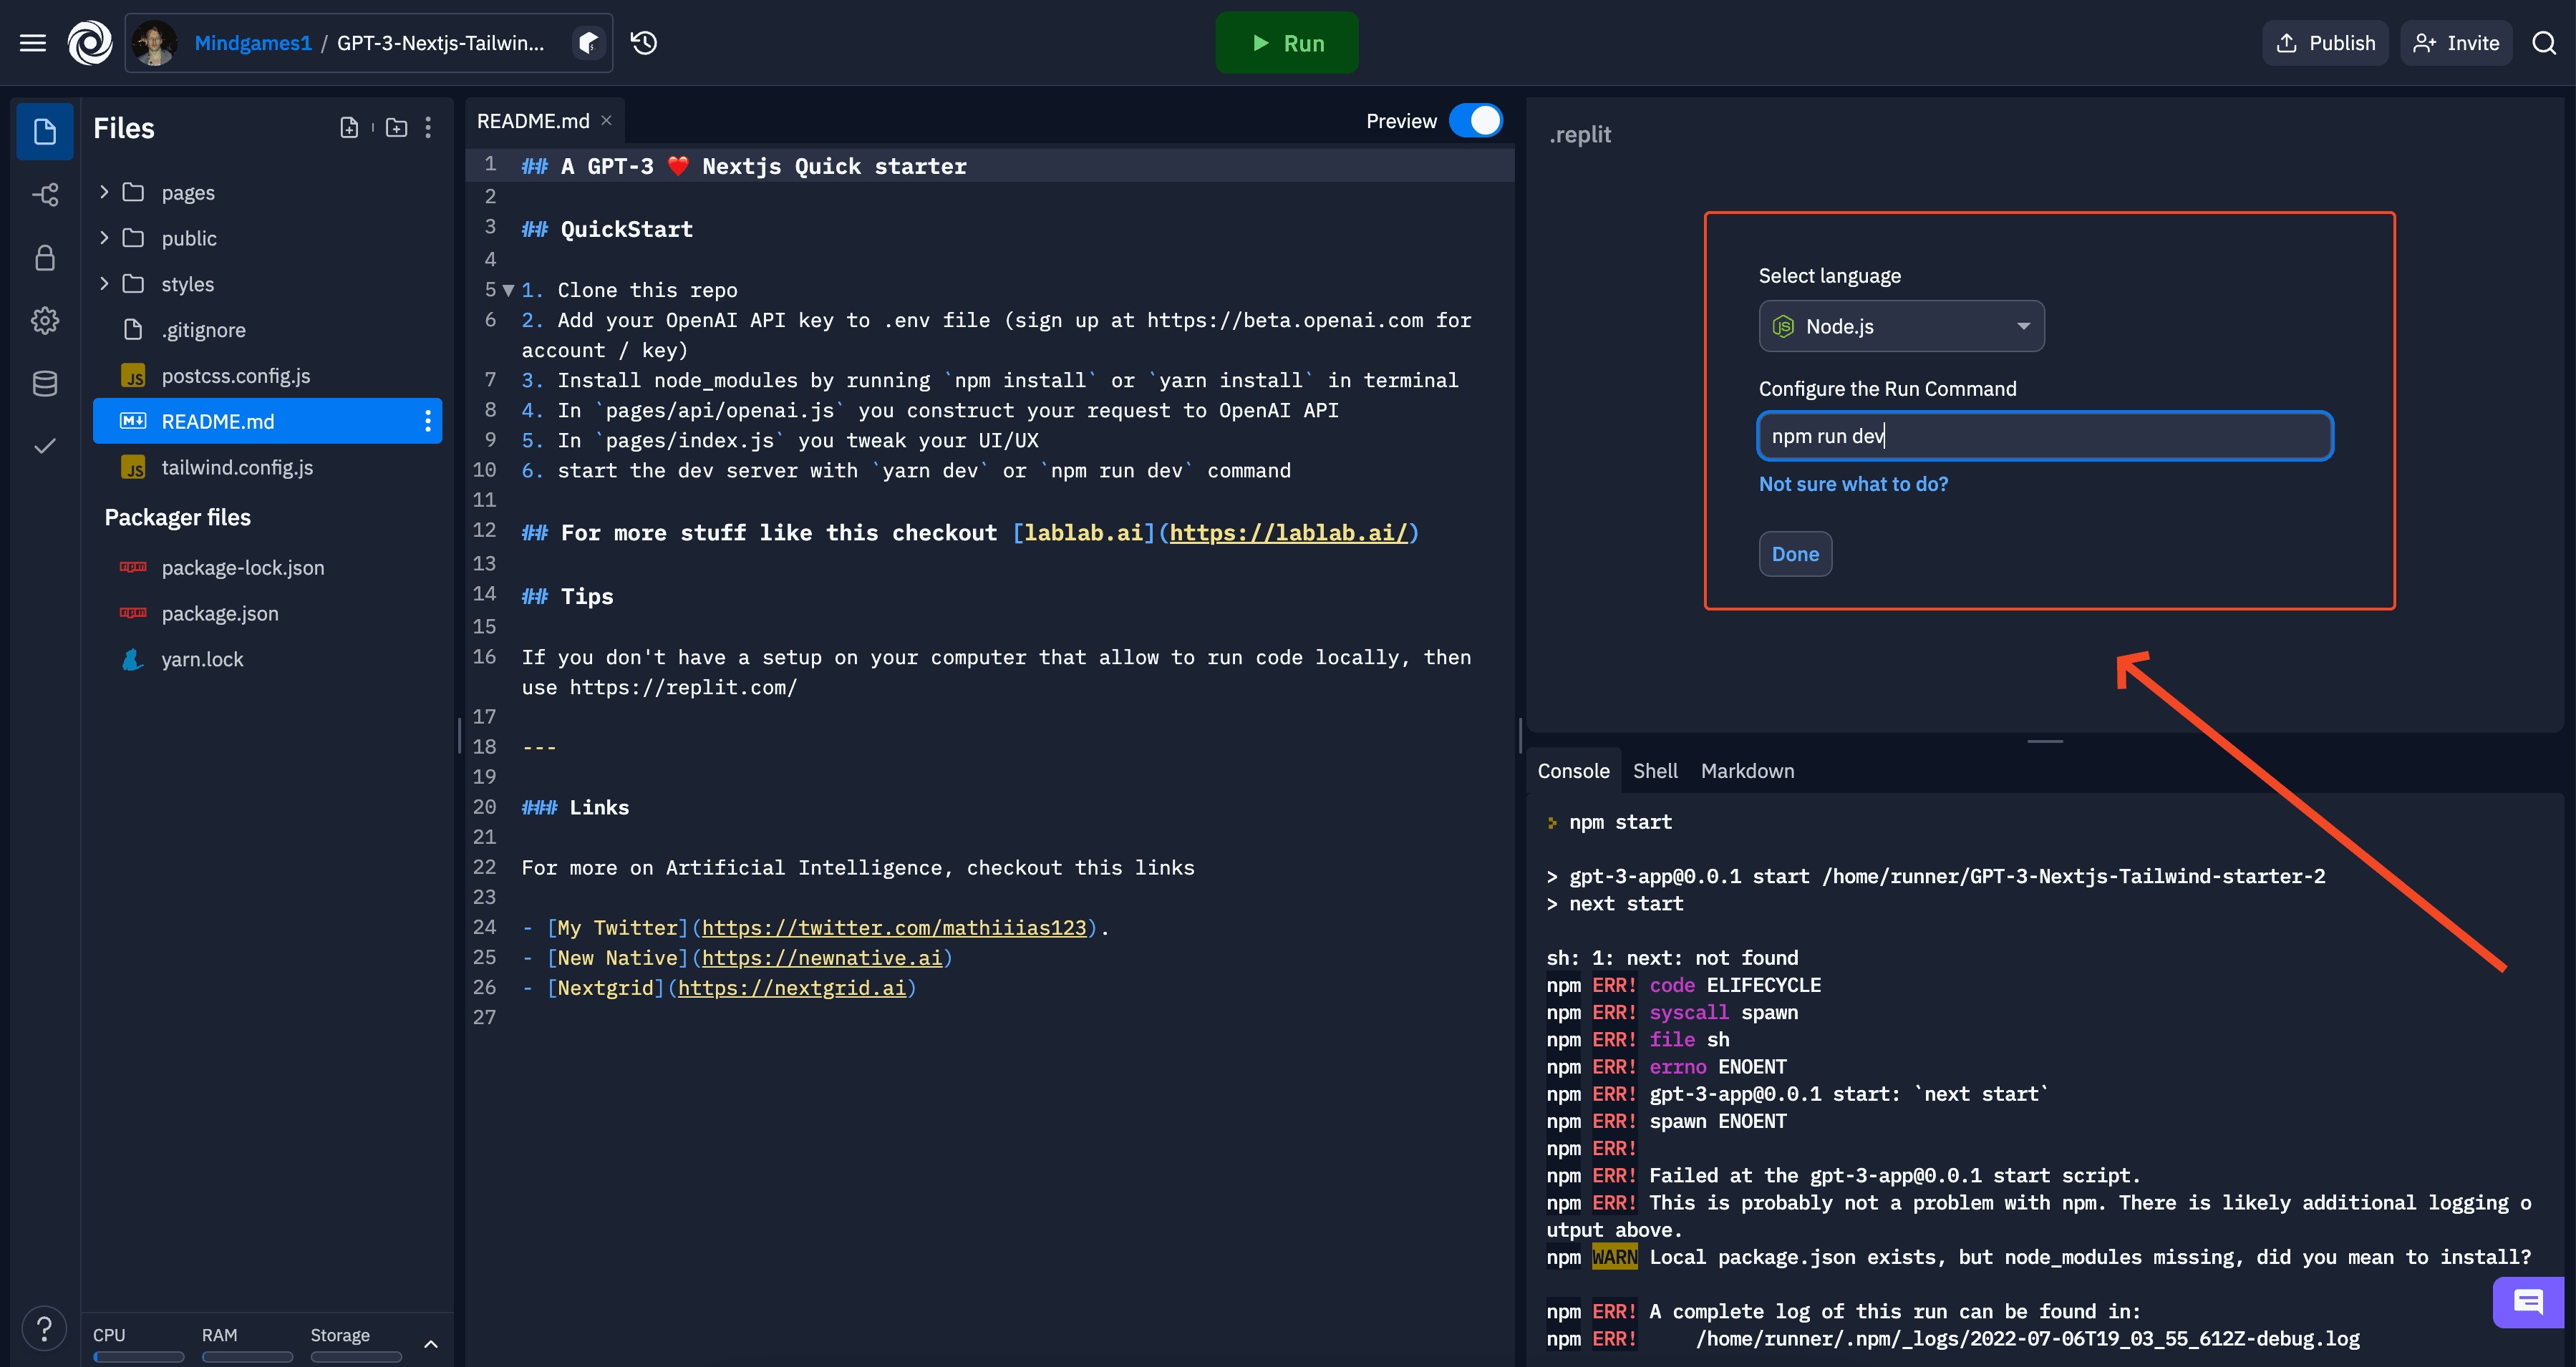
要设置我们的 OpenAI GPT-3 API 密钥,我们首先需要单击右侧的锁🔒 图标 在密钥字段中写入 OPENAI_API_KEY 在值字段中写入您的 GPT-3 API 密钥 2.更新运行命令 要启动我们的应用程序,我们需要更新运行命令。
在运行命令字段中,将命令更改 npm run start为 npm run dev单击 完成 按钮
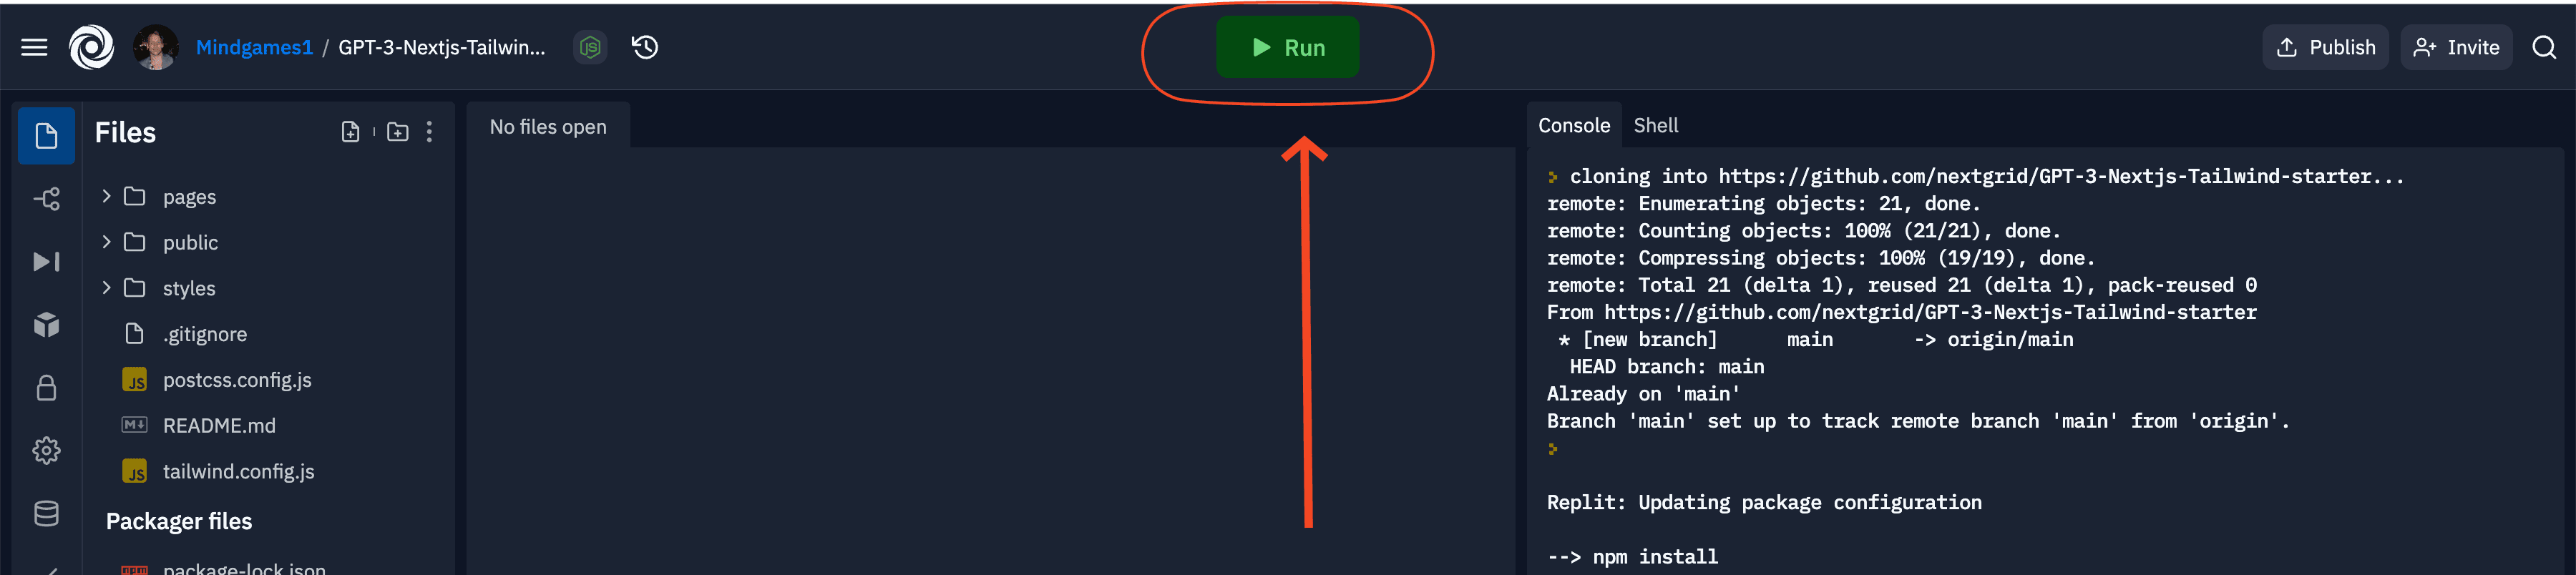
3.安装依赖,启动开发环境 现在是时候安装所有依赖项并启动开发环境了。点击大绿色
要设置我们的 OpenAI GPT-3 API 密钥,我们首先需要单击右侧的锁🔒 图标 等待开发环境安装并启动 单击 RUN 按钮后,您将在控制台窗口中看到一个输出,它首先会安装软件包,然后启动开发服务器
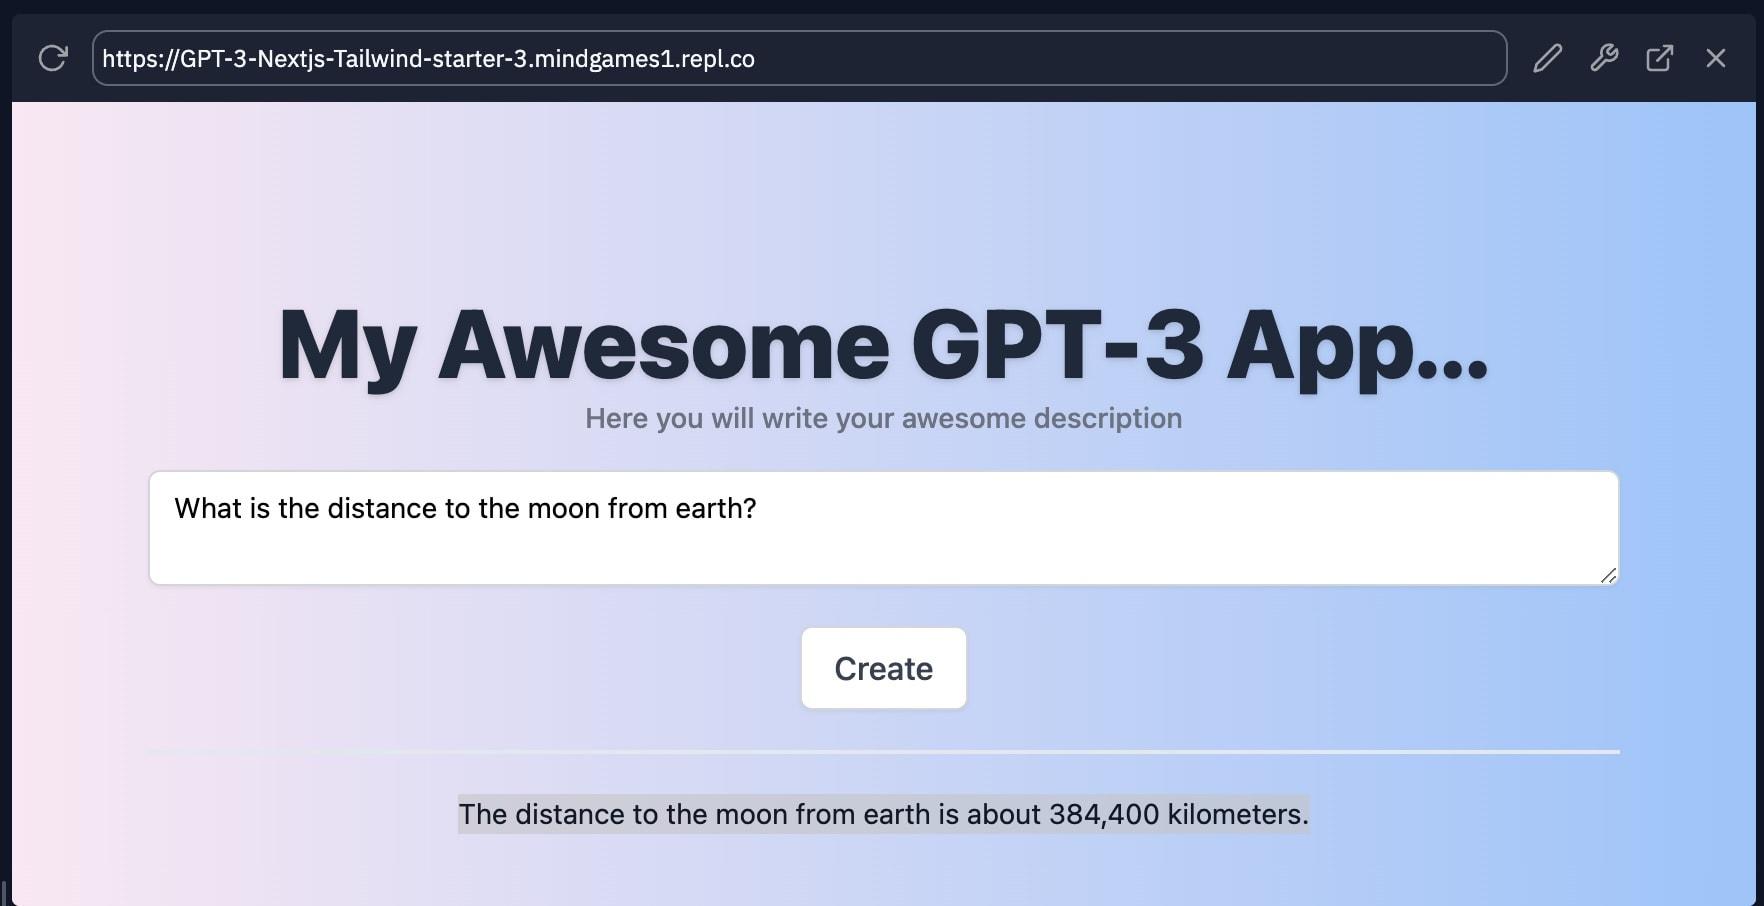
完成后,您将在控制台上方的窗口中看到您的 webapp
要设置我们的 OpenAI GPT-3 API 密钥,我们首先需要单击右侧的锁🔒 图标 更新运行命令后,您可以单击“运行”按钮来安装依赖项并启动开发环境。
构建我们的 GPT-3 驱动的应用程序 现在我们有一个简单的前端连接到我们的 GPT-3 支持的后端。如果您在文本字段中输入文本,您将看到生成的响应。让我们试着输入一段文字,看看会发生什么。
在文本字段中输入文本,然后单击 创建 按钮
您的输入:
GPT-3 输出:
自定义我们的 GPT-3 驱动的应用程序 在这个阶段,您应该有一个 GPT-3 驱动的应用程序,您可以使用它来生成文本,现在是时候根据我们的需要配置应用程序了。就我而言,我将创建一个 GPT-3 驱动的应用程序,帮助总结一篇文章,我们可以将其用作社交媒体帖子的副本。
1.配置API端点 从打开开始 /pages/api/openai.js文件应该看起来像这样
为了让我们的生活更轻松,我添加了以下值
和将使我们可以轻松地在将提示发送到 GPT-3 API 之前添加我们希望在提示前后出现的值 $beforePrompt。 $afterPrompt
在构建社交媒体帖子生成器时,我将使用以下值
2. 让我们更新我们的前端以反映我们的应用程序功能 打开 /pages/index.js并编辑 </code><span style="vertical-align: inherit;">,</span><code>H1</code><span style="vertical-align: inherit;">和</span><code><p></code><span style="vertical-align: inherit;">标签以反映我们的应用程序功能</span></p>
<h3 id="3-time-to-test-our-application-and-the-result" class="h3-9"><span class="ez-toc-section" id="3_%E6%B5%8B%E8%AF%95%E6%88%91%E4%BB%AC%E7%9A%84%E5%BA%94%E7%94%A8%E7%A8%8B%E5%BA%8F%E5%92%8C%E7%BB%93%E6%9E%9C%E7%9A%84%E6%97%B6%E9%97%B4"></span><span style="vertical-align: inherit;">3. 测试我们的应用程序和结果的时间</span><span class="ez-toc-section-end"></span></h3>
<p><span style="vertical-align: inherit;">我选择了我在 Techcrunch 上找到的以下文章来试用该应用程序。</span></p>
<figure class="w-full intrinsic"><img decoding="async" class="w-full rounded-lg shadow-md lazy" style="color: transparent;" src="https://www.aihubpro.cn/wp-content/themes/b2/Assets/fontend/images/default-img.jpg" alt="如何使用 GPT-3 教程:在 20 分钟内使用 NextJS 和 Replit 构建您自己的 GPT-3 驱动的应用程序" width="1000" height="1000" data-nimg="1" data-src="http://www.pozzm.com/caiji/data/images/2023-11-07/70508b070a9336f0308a9a9f92d6b998.png"><figcaption class="-mt-3 text-center text-sm text-gray-500 underline line-clamp-2"><span style="vertical-align: inherit;">单击 **create** 按钮后,您将在控制台中看到生成的文本。</span></figcaption></figure>
<p><span style="vertical-align: inherit;">Instagram 刚刚宣布了一项新功能,允许企业提升他们的 Reels 以将其转化为广告!这是接触新受众并宣传您的品牌故事的好方法。请记得检查您的洞察力,看看哪些广告效果最好。</span></p>
<h2 id="final-words" class="h2-5"><span class="ez-toc-section" id="%E6%9C%80%E5%90%8E%E7%9A%84%E8%AF%9D"></span><span style="vertical-align: inherit;">最后的话</span><span class="ez-toc-section-end"></span></h2>
<p><span style="vertical-align: inherit;">希望您喜欢这个简单的教程。希望您现在有一个简单的基础,可以让您构建其他类型的应用程序。</span></p>
<div class='yarpp yarpp-related yarpp-related-website yarpp-template-list'>
</div>
</article>
</div>
</div>
</div>
</section>
</div>
</div>
</main>
<footer class="main-footer footer-type-1 text-xs">
<div id="footer-tools" class="d-flex flex-column">
<a href="javascript:" id="go-to-up" class="btn rounded-circle go-up m-1" rel="go-top">
<i class="iconfont icon-to-up"></i>
</a>
<a href="javascript:" data-toggle="modal" data-target="#search-modal" class="btn rounded-circle m-1"
rel="search" one-link-mark="yes">
<i class="iconfont icon-search"></i>
</a>
<a href="/about/" class="btn rounded-circle kefu m-1" target="_blank" data-toggle="tooltip" data-placement="left" title="联系我们">
<i class="mode-ico iconfont icon-qq"></i>
</a>
<a href="javascript:" onclick="window.location.href='javascript:switchNightMode()'" class="btn rounded-circle switch-dark-mode m-1" id="yejian"
data-toggle="tooltip" data-placement="left" title="日间模式">
<i class="mode-ico iconfont icon-night"></i>
</a>
</div>
<div class="footer-inner">
<div class="footer-text">本站内容源自互联网,如有内容侵犯了你的权益,请联系删除相关内容,联系邮箱:sxkk2008@163.com <br/>© 2022 - 2023 By | <a href="http://pozzm.com/">PandaE AI网址导航</a><br/ <br/><a href="https://beian.miit.gov.cn/">陕ICP备20001986号-2</a><br/></div>
</div>
</footer>
</div>
</div>
<script type='text/javascript' src='/assets/js/jquery.ui.touch-punch.min-0.2.2.js' id='jqueryui-touch-js'></script>
<script type='text/javascript' src='/assets/js/clipboard.min-5.6.2.js' id='clipboard-js'></script>
<script type='text/javascript' src='/assets/js/tooltip-extend.js' id='iplaycode-nav-js'></script>
<script type='text/javascript' id='popper-js-extra'>
var theme = {"ajaxurl":"","addico":"https:\/\/nav.baidu.cn\/wp-content\/themes\/onenav\/images\/add.png","order":"asc","formpostion":"top","defaultclass":"io-grey-mode","isCustomize":"1","icourl":"","icopng":".png","urlformat":"1","customizemax":"10","newWindow":"0","lazyload":"1","minNav":"1","loading":"1","hotWords":"baidu","classColumns":" col-sm-6 col-md-4 col-xl-5a col-xxl-6a ","apikey":"TWpBeU1UVTNOekk1TWpVMEIvZ1M2bFVIQllUMmxsV1dZelkxQTVPVzB3UW04eldGQmxhM3BNWW14bVNtWk4="};
</script>
<script type='text/javascript' src='/assets/js/popper.min.js' id='popper-js'></script>
<script type='text/javascript' src='/assets/js/bootstrap.min-4.3.1.js' id='bootstrap-js'></script>
<script type='text/javascript' src='/assets/js/theia-sticky-sidebar-1.5.0.js' id='sidebar-js'></script>
<script type='text/javascript' src='/assets/js/lazyload.min-12.4.0.js' id='lazyload-js'></script>
<script type='text/javascript' src='/assets/js/fancybox.min-3.5.7.js' id='lightbox-js-js'></script>
<script type='text/javascript' src='/assets/js/app-anim.js' id='appanim-js'></script>
<script type="text/javascript">
$(document).ready(function(){
var siteWelcome = $('#loading');
siteWelcome.addClass('close');
setTimeout(function() {
siteWelcome.remove();
}, 600);
});
</script>
<script>
$(document).ready(function(){
setTimeout(function () {
if ($('a.smooth[href="' + window.location.hash + '"]')[0]) {
$('a.smooth[href="' + window.location.hash + '"]').click();
}else if (window.location.hash != '') {
$("html, body").animate({
scrollTop: $(window.location.hash).offset().top - 90
}, {
duration: 500,
easing: "swing"
});
}
}, 300);
$(document).on('click','a.smooth',function(ev) {
if($('#sidebar').hasClass('show') && !$(this).hasClass('change-href')){
$('#sidebar').modal('toggle');
}
if($(this).attr("href").substr(0, 1) == "#"){
$("html, body").animate({
scrollTop: $($(this).attr("href")).offset().top - 90
}, {
duration: 500,
easing: "swing"
});
}
if($(this).hasClass('go-search-btn')){
$('#search-text').focus();
}
if(!$(this).hasClass('change-href')){
var menu = $("a"+$(this).attr("href"));
menu.click();
toTarget(menu.parent().parent(),true,true);
}
});
$(document).on('click','a.tab-noajax',function(ev) {
var url = $(this).data('link');
if(url)
$(this).parents('.d-flex.flex-fill.flex-tab').children('.btn-move.tab-move').show().attr('href', url);
else
$(this).parents('.d-flex.flex-fill.flex-tab').children('.btn-move.tab-move').hide();
});
});
</script>
<script>
(function(){
if(document.cookie.replace(/(?:(?:^|.*;\s*)night\s*\=\s*([^;]*).*$)|^.*$/, "$1") === ''){
if(new Date().getHours() > 22 || new Date().getHours() < 6){
document.body.classList.remove('io-black-mode');
document.body.classList.add('io-grey-mode');
document.cookie = "night=1;path=/";
console.log('夜间模式开启');
}else{
document.body.classList.remove('night');
document.cookie = "night=0;path=/";
console.log('夜间模式关闭');
}
}else{
var night = document.cookie.replace(/(?:(?:^|.*;\s*)night\s*\=\s*([^;]*).*$)|^.*$/, "$1") || '0';
if(night == '0'){
document.body.classList.remove('night');
}else if(night == '1'){
document.body.classList.add('night');
}
}
})();
$("#search-bg").css("background", "linear-gradient(#e2c4c4, #d8d8d8)");
function switchNightMode(){
var night = document.cookie.replace(/(?:(?:^|.*;\s*)night\s*\=\s*([^;]*).*$)|^.*$/, "$1") || '0';
if(night == '0'){
$("#search-bg").css("background", "linear-gradient(#e2c4c4, #d8d8d8)");
document.body.classList.remove('io-grey-mode');
document.body.classList.add('io-black-mode');
document.cookie = "night=1;path=/"
console.log(' ');
$(".switch-dark-mode").attr("data-original-title","日间模式");
$(".mode-ico").removeClass("icon-night");
$(".mode-ico").addClass("icon-light");
}else{
$("#search-bg").css("background", "linear-gradient(#4f4040, #1b1d1f)");
document.body.classList.remove('io-black-mode');
document.body.classList.add('io-grey-mode');
document.cookie = "night=0;path=/"
console.log(' ');
$(".switch-dark-mode").attr("data-original-title","夜间模式");
$(".mode-ico").removeClass("icon-light");
$(".mode-ico").addClass("icon-night");
}
}
</script>
<script>
var newsContainer = document.getElementById('news-container');
var newsItems = document.getElementsByClassName('news-item');
var currentItem = 0;
setInterval(function() {
newsItems[currentItem].classList.remove('show');
newsItems[currentItem].style.transform = 'translateY(-20px)';
currentItem = (currentItem + 1) % newsItems.length;
newsItems[currentItem].style.transform = 'translateY(' + (newsContainer.offsetHeight - 20) + 'px)';
setTimeout(function() {
newsItems[currentItem].classList.add('show');
}, 500);
}, 8000);
</script>
</body>
</html>