
Chroma 教程:如何赋予 GPT-3.5 聊天机器人类似记忆的功能
为什么我的聊天机器人应该具有类似记忆的功能?
在本教程中,我们将逐步介绍将 Chroma 数据库与 OpenAI 的 GPT-3.5 模型集成的步骤,旨在为聊天机器人提供类似记忆的功能。这一独特的功能使聊天机器人能够参考过去的交流,同时制定其响应,本质上充当机器人的“记忆”。这种内存机制不仅增强了聊天机器人在扩展交互中维护上下文的能力,而且还提供了克服某些 OpenAI 模型上下文窗口大小固有限制的优势,同时节省令牌以实现更有效的使用。真正独特且令人惊叹的功能,可以提高人工智能应用程序的用户体验质量。
什么是嵌入?
嵌入是一种向量表示,其中相似的项目由接近的向量表示,不同的项目由遥远的向量表示。在自然语言处理 (NLP) 的背景下,嵌入用于表示单词、句子甚至整个文档。现在,如果您涉足计算机视觉或使用过 OpenCV 等图像对象检测库,矢量表示的概念应该会引起您的注意,因为它是精确定位图像相似性的首选技术。这些嵌入捕获文本的语义,使我们能够对它们执行数学运算,例如查找两个向量之间的余弦相似度来衡量两段文本的相似程度。
在这种特殊情况下,嵌入至关重要,因为它们允许我们根据语义相似性而不是精确的文本匹配来存储和检索过去的对话。这意味着我们的聊天机器人可以理解之前对话的含义,而不仅仅是记住确切的单词。因此,我们可以使用向量表示从数据库中搜索某些项目,而不是搜索包含某些单词的短语。
什么是 ChromaDB?
引用官方文档,Chroma 是开源嵌入数据库。Chroma 将嵌入及其元数据存储起来,并通过使用其内置功能帮助嵌入文档(将文档转换为向量),并根据嵌入文档查询存储的嵌入。
先决条件
Python基础知识访问OpenAI的GPT-3,5A Chroma数据库设置
大纲
初始化项目设置所需的库编写主文件测试基本聊天机器人设置 Chroma 数据库测试增强型聊天机器人
讨论
初始化项目
让我们开始编码吧!首先,我们需要初始化项目,我们称之为chroma-openai。创建项目目录,作为最佳实践,我们需要专门为此项目创建一个新的虚拟环境。这有助于使项目的依赖项与我们的全局环境隔离。
# Let's make the directorymkdir chroma-openai# create a new virtual environment for this project. You can give it whatever name you like, for this tutorial, I choose chromaenv.python3 -m venv chromaemv# this will create a new virtual environment called `env` in our project.然后,我们激活虚拟环境。根据我们正在开发的操作系统,我们可以这样做。
在 Windows 上
.\chromaenv\Scripts\activate在 Linux/MacOS 上
source chromaenv/bin/activate激活 env 后,我们的终端应如下所示,其中虚拟环境的名称位于括号内。

设置所需的库
接下来,我们需要设置所有必需的库。为了简单起见,我们仅安装openai用于调用 GPT-3.5 模型以及提供嵌入函数、chromadb存储嵌入以及一些库,例如halo用于每个请求的甜蜜加载指示器。
# In this tutorial, I use pip3 to install python libraries, but if you use `pip` instead, feel free to switch it.# OpenAI librarypip3 install openai# ChromaDB for storing the embeddingspip3 install chromadb# Halo for loading indicatorpip3 install halo编写项目文件
现在,我们回到编码部分。使用您最喜欢的 IDE/代码编辑器创建一个新文件,我们将其命名为 main.py,因为它是我们在该项目中创建的唯一 Python 文件。
main.py 🐍
首先,让我们导入所有必需的依赖项。目前,我们只导入openai和halo库,以及其他标准库。
from dotenv import load_dotenvimport osimport openaiimport pprintfrom halo import Halo导入所有必需的依赖项后,我们从 .env 文件加载常量变量,之后我们将访问该文件。
load_dotenv()现在,我们将编写最重要的函数,它将处理向 OpenAI 模型发送请求并返回响应。
def generate_response(messages): # Create a loading spinner spinner = Halo(text='Loading...', spinner='dots') spinner.start() # Load the OpenAI key and model name from environment variables openai.api_key = os.getenv("OPENAI_KEY") model_name = os.getenv("MODEL_NAME") # Create a chat completion with the provided messages response = openai.ChatCompletion.create( model=model_name, messages=messages, temperature=0.5, max_tokens=250) # Stop the spinner once the response is received spinner.stop() # Pretty-print the messages sent to the model pp = pprint.PrettyPrinter(indent=4) print("Request:") pp.pprint(messages) # Print the usage statistics for the completion print(f"Completion tokens: {response['usage']['completion_tokens']}, Prompt tokens: {response['usage']['prompt_tokens']}, Total tokens: {response['usage']['total_tokens']}") # Return the message part of the response return response['choices'][0]['message']现在,这个函数将在哪里被调用?main()当然是在旧功能中!所以,我们来写吧!
def main(): # Initialize the messages with a system message, let's say we're talking to a wise wizard bot. messages=[ {"role": "system", "content": "You are a kind and wise wizard"} ] # Continue chatting until the user types "quit" while True: input_text = input("You: ") if input_text.lower() == "quit": break # Add the user's message to the messages messages.append({"role": "user", "content": input_text}) # Get a response from the model and add it to the messages response = generate_response(messages) messages.append(response) # Print the assistant's response print(f"Wizard: {response['content']}")最后,我们添加这个脚本的入口点,正如我们 Python 爱好者可能已经知道的那样,它是 if 子句:
if __name__ == "__main__": main()让我们再看一遍吧!该main.py文件应包含以下脚本:
# main.pyfrom dotenv import load_dotenvimport osimport openaiimport pprintfrom halo import Halo# Load environment variables from a .env fileload_dotenv()# Function to generate a response from the modeldef generate_response(messages): # Create a loading spinner spinner = Halo(text='Loading...', spinner='dots') spinner.start() # Load the OpenAI key and model name from environment variables openai.api_key = os.getenv("OPENAI_KEY") model_name = os.getenv("MODEL_NAME") # Create a chat completion with the provided messages response = openai.ChatCompletion.create( model=model_name, messages=messages, temperature=0.5, max_tokens=250) # Stop the spinner once the response is received spinner.stop() # Pretty-print the messages sent to the model pp = pprint.PrettyPrinter(indent=4) print("Request:") pp.pprint(messages) # Print the usage statistics for the completion print(f"Completion tokens: {response['usage']['completion_tokens']}, Prompt tokens: {response['usage']['prompt_tokens']}, Total tokens: {response['usage']['total_tokens']}") # Return the message part of the response return response['choices'][0]['message']# Main function to run the chatbotdef main(): # Initialize the messages with a system message messages=[ {"role": "system", "content": "You are a kind and wise wizard"} ] # Continue chatting until the user types "quit" while True: input_text = input("You: ") if input_text.lower() == "quit": break # Add the user's message to the messages messages.append({"role": "user", "content": input_text}) # Get a response from the model and add it to the messages response = generate_response(messages) messages.append(response) # Print the assistant's response print(f"Wizard: {response['content']}")# Run the main function when the script is runif __name__ == "__main__": main().env 🌏
接下来,我们在文件中定义常量变量.env。这被认为是最佳实践,因为我们最终会将这个项目推送到公共存储库(例如 github)上。我们不希望我们的 API 密钥暴露给公众并冒被滥用的风险。
# your own API keyOPENAI_KEY=sk-xxxxxxx# for this tutorial, we will use GPT-3.5 (Turbo) which is considered faster and cheaper while on par with GPT-3 Davinci in term of performance.MODEL_NAME=gpt-3.5-turbo-0301需求.txt 📄
最后,我们将把依赖项列表记录到一个名为requirements.txt. 这也被认为是一种最佳实践,因为其他开发人员将能够使用一个简单的命令来安装所需的库。
# "Freeze" the dependencies, storing the list into a filepip3 freeze /> requirements.txt# If you want to install the dependencies of this project, run thispip3 install -r requirements.txt测试基本聊天机器人
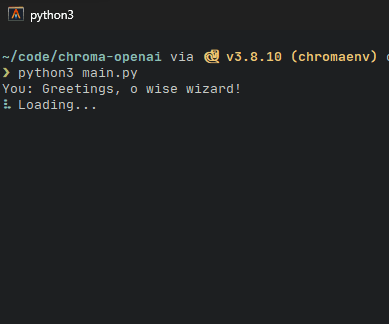
现在是关键时刻!或者至少是前半部分。让我们使用此命令在您最喜欢的终端上运行该文件。
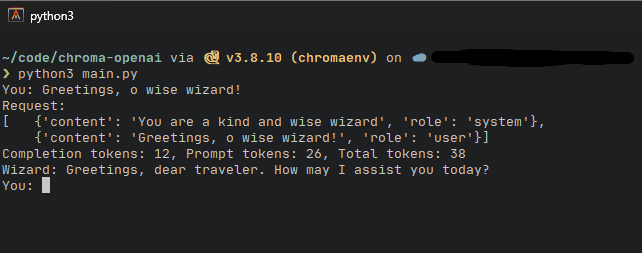
python3 main.py如果一切顺利,我们的终端将返回输入提示。让我们开始和巫师交谈吧!请注意在等待响应时甜蜜的加载指示器是如何显示的。
过了一会儿,就会出现响应。在此项目中,我们还显示发送的实际请求以及用于对话的总令牌。
让我们和机器人多谈谈吧..
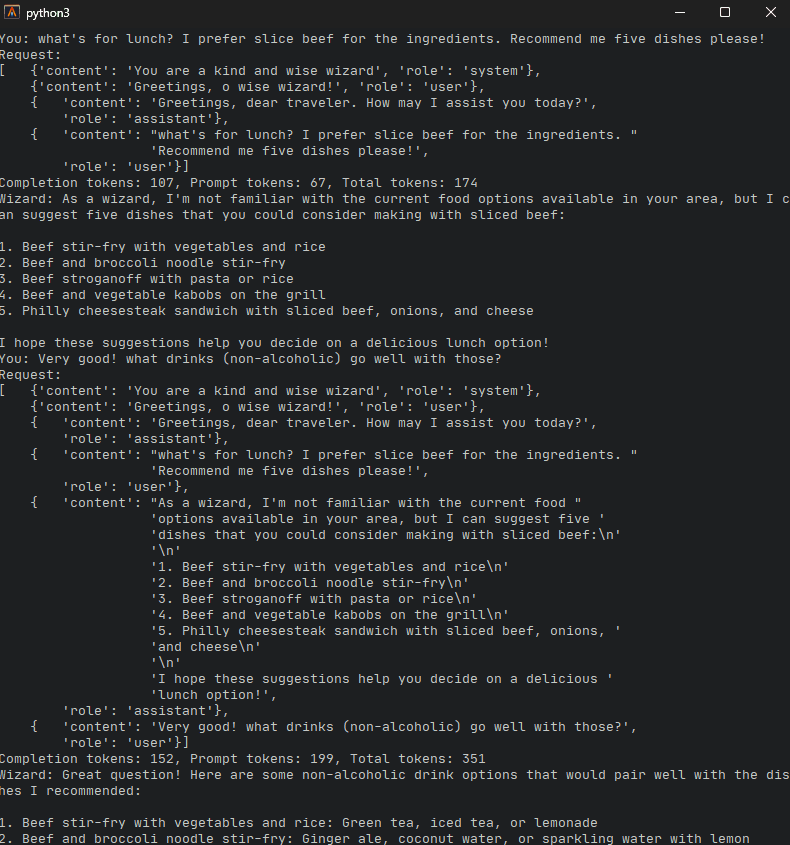
此时,我们注意到请求将如何累加每个后续对话。请求越多,将使用越多的令牌。然而,到目前为止,这是机器人保留某种“记忆”的唯一方法之一,机器人将如何记住对话中的各个方面,至少直到它达到上下文限制。此时,我们需要重置机器人并丢失之前的聊天记录。
这就是 Chroma 数据库的用武之地!借助嵌入存储和查询的强大功能,存储对话和调用对话将变得轻而易举。
设置 Chroma 数据库
敏锐的读者可能会注意到我们之前已经chromadb使用pip3 install命令进行了安装。因此,我们需要对文件进行更改main.py。
首先,我们导入必要的库和包
from dotenv import load_dotenv import os import openai import pprint from halo import Halo+import chromadb+from chromadb.utils.embedding_functions import OpenAIEmbeddingFunction接下来,我们需要初始化 ChromaDB。在主函数的开头,我们添加这些变量。由于 ChromaDB 需要 ID 作为其嵌入的标识符,因此我们初始化一个变量作为计数器,以增加每条记录的 id。另请注意,我们删除了初始系统消息,我们将向下移动该消息以停止 while 循环以附加每个聊天历史记录。
def main():- messages=[- {"role": "system", "content": "You are a kind and wise wizard"}- ]+ chroma_client = chromadb.Client()+ embedding_function = OpenAIEmbeddingFunction(api_key=os.getenv("OPENAI_KEY"), model_name=os.getenv("EMBEDDING_MODEL"))+ collection = chroma_client.create_collection(name="conversations", embedding_function=embedding_function)+ current_id = 0在 while 循环内,我们初始化列表来存储聊天历史记录、元数据和每个聊天历史记录的 ID。
while True:+ chat_history = []+ chat_metadata = []+ history_ids = [] messages=[ {"role": "system", "content": "You are a kind and wise wizard"} ] input_text = input("You: ") if input_text.lower() == "quit": break在该代码下方,我们在每个循环开始时查询存储的嵌入。在这个项目中,我们只查询assistant角色(机器人)的聊天记录。这段代码中真正发生的是我们的输入文本,如果首先转换为向量,然后用作参数来查询 Chroma 数据库中两个最近的嵌入。
+ results = collection.query(+ query_texts=[input_text],+ where={"role": "assistant"},+ n_results=2+ )最后,我们将结果添加为下一次对话的输入。这样,只有两个最相关的聊天历史记录被添加到下一个聊天输入中,避免了不相关的条目,从而进一步节省了令牌成本。
+ for res in results['documents'][0]:+ messages.append({"role": "user", "content": f"previous chat: {res}"}) messages.append({"role": "user", "content": input_text}) response = generate_response(messages)+ chat_metadata.append({"role":"user"})+ chat_history.append(input_text)+ chat_metadata.append({"role":"assistant"})+ chat_history.append(response['content'])+ current_id += 1+ history_ids.append(f"id_{current_id}")+ current_id += 1+ history_ids.append(f"id_{current_id}")+ collection.add(+ documents=chat_history,+ metadatas=chat_metadata,+ ids=history_ids+ ) print(f"Wizard: {response['content']}") if __name__ == "__main__": main()总而言之,整体代码应如下所示:
from dotenv import load_dotenvimport osimport openaiimport pprintfrom halo import Haloimport chromadbfrom chromadb.utils.embedding_functions import OpenAIEmbeddingFunction# Load environment variablesload_dotenv()pp = pprint.PrettyPrinter(indent=4)def generate_response(messages): spinner = Halo(text='Loading...', spinner='dots') spinner.start() openai.api_key = os.getenv("OPENAI_KEY") model_name = os.getenv("MODEL_NAME") response = openai.ChatCompletion.create( model=model_name, messages=messages, temperature=0.5, max_tokens=250) spinner.stop() print("Request:") pp.pprint(messages) print(f"Completion tokens: {response['usage']['completion_tokens']}, Prompt tokens: {response['usage']['prompt_tokens']}, Total tokens: {response['usage']['total_tokens']}") return response['choices'][0]['message']def main(): chroma_client = chromadb.Client() embedding_function = OpenAIEmbeddingFunction(api_key=os.getenv("OPENAI_KEY"), model_name=os.getenv("EMBEDDING_MODEL")) collection = chroma_client.create_collection(name="conversations", embedding_function=embedding_function) current_id = 0 while True: chat_history = [] chat_metadata = [] history_ids = [] messages=[ {"role": "system", "content": "You are a kind and wise wizard"} ] input_text = input("You: ") if input_text.lower() == "quit": break results = collection.query( query_texts=[input_text], where={"role": "assistant"}, n_results=2 ) # append the query result into the messages for res in results['documents'][0]: messages.append({"role": "user", "content": f"previous chat: {res}"}) # append user input at the end of conversation chain messages.append({"role": "user", "content": input_text}) response = generate_response(messages) chat_metadata.append({"role":"user"}) chat_history.append(input_text) chat_metadata.append({"role":"assistant"}) chat_history.append(response['content']) current_id += 1 history_ids.append(f"id_{current_id}") current_id += 1 history_ids.append(f"id_{current_id}") collection.add( documents=chat_history, metadatas=chat_metadata, ids=history_ids ) print(f"Wizard: {response['content']}")if __name__ == "__main__": main()测试增强型聊天机器人
最后,真正的关键时刻!再次运行脚本。这次,记下标准输出上打印的请求。在后续的聊天中,我们会注意到脚本不再将整个对话历史记录作为模型的输入发送,而是仅选择系统聊天和两个最相关的查询结果,以及我们最近的输入。查询结果是根据相似性进行查询的,可以作为聊天机器人的“记忆”,只有当用户在聊天中谈论它时才会出现。
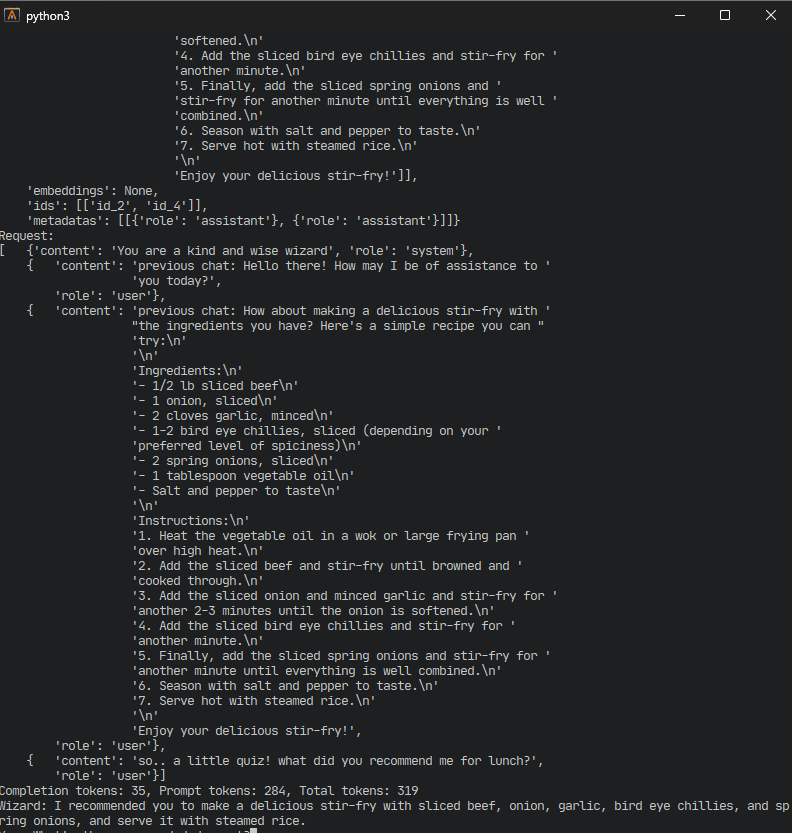
请注意,我让聊天机器人做了一个小测验来测试其记忆力,效果很好!